





Manor

Farming lets castle owners and ordinary players earn profit at the same time, and also fills the market with needed goods and resources.
Contents |
Farming for ordinary players
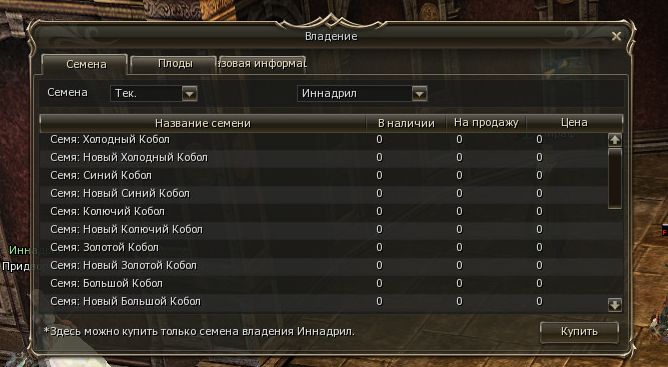
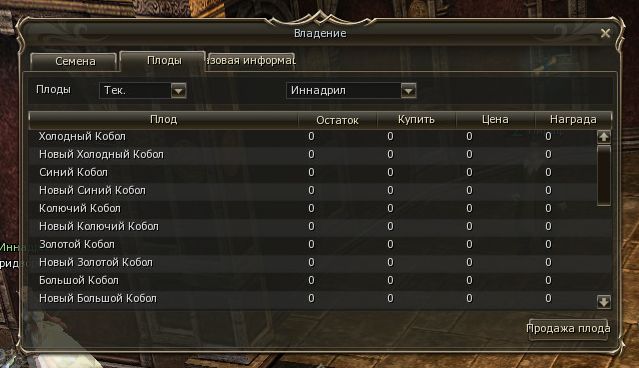
For ordinary players who aren't in castle-owning clans, farming means buying seeds, sowing them in monsters while hunting, harvesting and exchanging the resulting crops for various resources. To farm, you'll need seeds and a Harvester. Every town has 1-2 NPCs — the Manor Manager. Seeds and crops are bought and sold through him, and you can also buy a harvester from him. At the Manor Manager you can see which seeds are on sale in which towns, and which crops each castle buys.
Manor Manager
- To view the information, choose the dialog option Check the manor status
- About seeds:
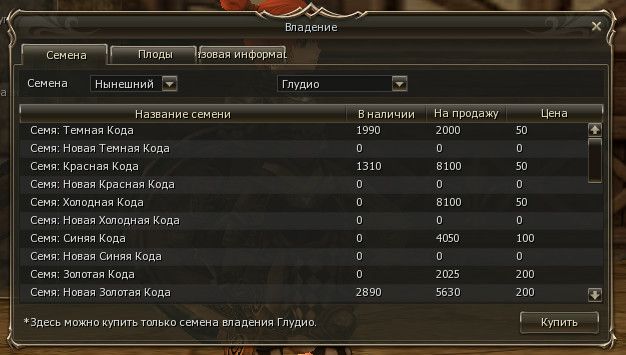
- In stock: How many seeds are sold now (or in the next period, if the corresponding option is selected)
- For sale: How many seeds were originally on sale (or how many will be sold in total in the next period)
- Price: The seed price in this period (or the next one, if the corresponding option is selected)
- About crops:
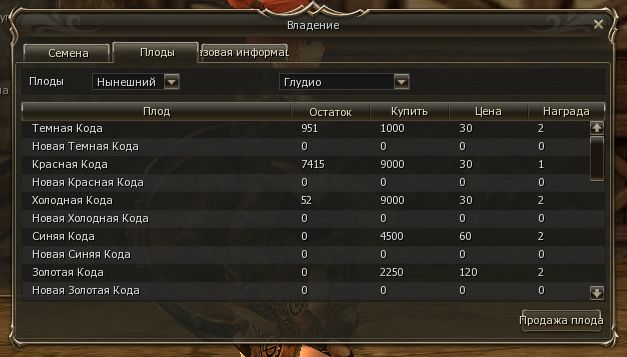
- Remaining: How many more crops of this type can be sold
- Buy: How many crops of this type were bought in total
- Price: The price at which your crops are bought
- Reward: The type of reward you'll get for handing in crops
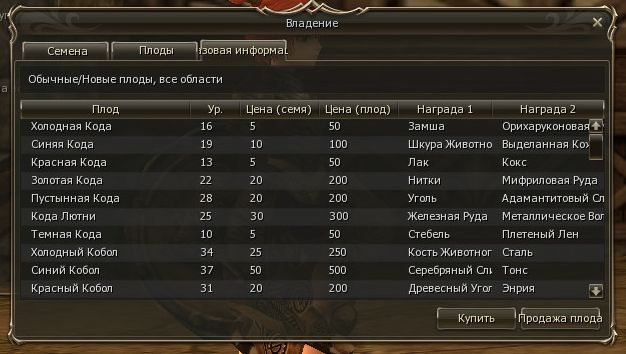
- About reward types:
- About seeds:


Seeds
Seeds come in 2 types — ordinary and new. Accordingly, ordinary seeds give ordinary crops and new seeds give new crops. The base sowing chance for ordinary seeds is 100%, and for new seeds 10-20%. With ordinary seeds, after sowing a seed and killing the monster, you'll get only adena or seal stones as loot, and spoil is preserved. With new seeds, the loot for killing the monster is preserved. Seeds are bought from the Manor Manager

Seed sales start at a random time between 20.00 and 20.08. At that time you can buy popular seeds. If you play a dwarf Scavenger/Bounty Hunter (spoiler), you can farm and spoil at the same time; the main condition is that after a successful sowing you must harvest first, and only then use  Sweeper.
Harvesting
- The principle of sowing and harvesting resembles spoiling, with some differences. Before or during a fight, you use a seed on the monster (from your inventory or the hotkey bar). An animation resembling spoil plays, after which your character attacks the monster. Depending on the seed type and the level differences between your character, the monster and the seed, the sowing attempt can succeed or fail (a special chat message will tell you), but the seed is lost regardless of the result.
- On a successful sowing attempt, you'll see a highlighted message in chat.
- On a failed sowing attempt, you can try to sow another seed in the monster after 8 seconds (unlike spoil, sowing has no reuse animation, so you'll have to judge "by eye"). Although the character starts attacking the monster, the sowing attempt doesn't count as an attack — the monster won't attack you, so you can stop attacking (for example, by running away from the monster) and try your luck again.
- Certain seeds can be used only on certain monsters living in the Hunting Zones belonging to the castle where you bought the seeds. So, for example, if you bought seeds in Gludio (which belongs to the Gludio castle zone), you can sow them in monsters in the Gludio hunting zones (you can see which castle a hunting zone belongs to in the "Information" section of the map).
- Each seed says which monster levels it is suitable for. The bigger the level difference between the monster and your character (up or down), the lower the chance of a successful harvest.
- After you kill the monster, you need to use the harvester on its corpse. If your target slipped off the monster during the fight, you can select the corpse with SHIFT + left click on the corpse. You'll get a sprouted seed — a crop — matching the type of seed sown.
Seeds are most profitably sown in monsters with x2 HP or more; the chance of sowing new seeds in x3 monsters is noticeably higher, and you can get both loot and a decent amount of crops.
| Crops | Monster level for sowing | Gludio | Dion | Giran | Oren | Aden | Innadril | Goddard | Rune | Schuttgart | Reward type 1 (base price) | Reward type 2 (base price) |
|---|---|---|---|---|---|---|---|---|---|---|---|---|
| Dark Coda | 5 - 15 | + | + | + |  Stem (  100 adena) | Braided Hemp ( 500 adena) | ||||||
| Red Coda | 8 - 18 | + | + | + | Varnish ( 200 adena) | Cokes ( 1 200 adena) | ||||||
| Chilly Coda | 11 - 21 | + | + | + | Suede ( 300 adena) | Oriharukon Ore ( 3 000 adena) | ||||||
| Blue Coda | 14 - 24 | + | + | + | + | Animal Skin ( 150 adena) |  Crafted Leather ( 5 700 adena) | |||||
| Golden Coda | 17 - 27 | + | + | + | + | Thread ( 100 adena) | Mithril Ore ( 1 000 adena) | |||||
| Lute Coda | 20 - 30 | + | + | + | Iron Ore ( 200 adena) |  Metallic Fiber ( 700 adena) | ||||||
| Desert Coda | 23 - 33 | + | + | + | Coal ( 200 adena) | Adamantite Nugget ( 5 000 adena) | ||||||
| Red Cobol | 26 - 36 | + | + | + | + | Charcoal ( 200 adena) |  Enria ( 12 000 Aden) | |||||
| Chilly Cobol | 29 - 39 | + | + | + | + | + | + | Animal Bone ( 150 adena) | Steel ( 2 000 adena) | |||
| Blue Cobol | 32 - 42 | + | + | + | + | + | + |  Silver Nugget ( 500 adena) |  Thons ( 6 000 adena) | |||
| Thorn Cobol | 35 - 45 | + | + | + | + | + | + | Stem ( 100 adena) | Metallic Thread ( 2 000 adena) | |||
| Golden Cobol | 38 - 48 | + | + | + | + | + | + | Varnish ( 200 adena) | Mold Glue ( 6 000 adena) | |||
| Great Cobol | 41 - 51 | + | + | + | + | + | + | Suede ( 300 adena) |  High Grade Suede ( 2 400 adena) | |||
| Red Codran | 44 - 54 | + | + | + | + | + | + | Leather ( 150 adena) | Asofe ( 6 000 adena) | |||
| Sea Codran | 45 - 55 | + | + | + | + | + | + | Thread ( 100 adena) | Cord ( 325 adena) | |||
| Chilly Codran | 47 - 57 | + | + | + | + | + | Iron Ore ( 200 adena) | Mold Hardener ( 23 000 Aden) | ||||
| Blue Codran | 50 - 60 | + | + | + | + | + | Coal ( 200 adena) | Leather ( 900 adena) | ||||
| Twin Codran | 53 - 63 | + | + | + | + | + | + | Charcoal ( 200 adena) | Mold Lubricant ( 10 000 Aden) | |||
| Great Codran | 56 - 66 | + | + | + | + | Animal Bone ( 150 adena) | Coarse Bone Powder ( 1 500 adena) | |||||
| Desert Codran | 59 - 69 | + | + | + | + | + | Silver Nugget ( 500 adena) | Durable Metal Plate ( 15 000 Aden) | ||||
| Blue Coba | 62 - 72 | + | + | + | + | + | Crafted Leather ( 5 700 adena) | Mold Glue ( 6 000 adena) | ||||
| Red Coba | 65 - 75 | + | + | + | + | + | Synthetic Cokes ( 6 600 adena) | Mold Lubricant ( 10 000 Aden) | ||||
| Gold Coba | 68 - 78 | + | + | + | + | + | + | Varnish of Purity ( 8 100 adena) | Mold Hardener ( 23 000 Aden) | |||
| Desert Coba | 71 - 81 | + | + | + | + | + | Asofe ( 6 000 adena) | Mithril Alloy ( 13 100 Aden) | ||||
| Sea Coba | 74 - 84 | + | + | + | + | + | + | Thons ( 6 000 adena) | Enria ( 12 000 Aden) | |||
| Twin Coba | 77 - 87 | + | + | + | + | + | High Grade Suede ( 2 400 adena) | Oriharukon ( 24 600 Aden) | ||||
| King Coba | 80 - 90 | + | + | Metallic Thread ( 2 000 adena) | Durable Metal Plate ( 15 000 Aden) |
Selling the crop
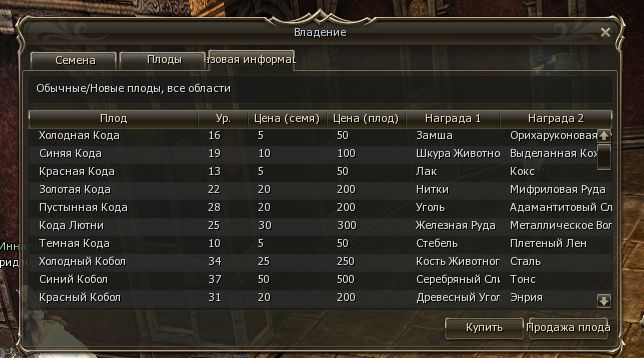
- For each kind of crop, regardless of type, you can get one of two specific materials when handing it in. Which material you get depends on the reward type (Type 1 or Type 2) set by the castle owner. For example, for Dark Coda crops you can get either Stem (Type 1) or Braided Hemp (Type 2).
- The harvest is handed in and the reward received from the same NPC — the Manor Manager, dialog option "Calculate resources":
- Crop hand-in starts at a random time between 20.00 and 20.08; when it starts, you don't see the full list of crops to hand in, but some random set, and you need to keep clicking refresh until your crops appear. By clicking "Change", you can choose the castle you'll sell the crops to and change the number of crops sold -
Calculating the amount of resources received
The number of materials received is calculated by the formula:
NM = NC * PC / PM
- NM number of resources received
- NC number of crops handed in
- PC the castle's crop purchase price
- PM base price of the resources
Farming for castle owners
- The castle lord manages the manor settings through the Chamberlain in the castle's Throne room — dialog option Manage the manor.
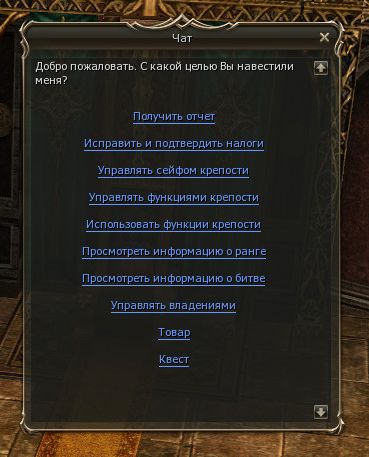
- Manor settings can be set from 20.00 to 4.30 of the next day. At 4.30, money is deducted from the castle treasury; if the treasury didn't have enough funds to pay, the castle's farming system is suspended.
- Viewing the set parameters: dialog option View Seed/Crop Status
- General information about seeds
- General information about crops
- General information about rewards
- General information about seeds
- Changing seed sale parameters: dialog option Edit Seed Setup
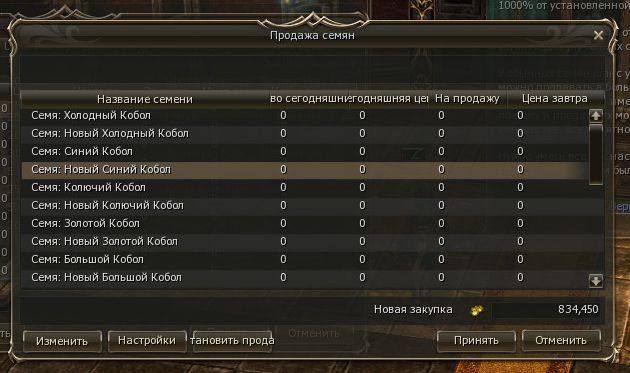
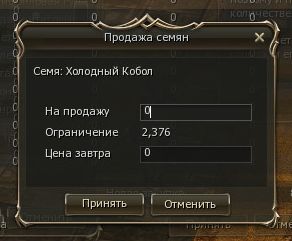
- Change: Opens a window for changing the parameters of the selected seeds.
- Settings: Copies the seed sale settings to the next period.
- Stop sales: Stops selling seeds to players.
- Changing crop purchase parameters: dialog option Edit Crop Setup
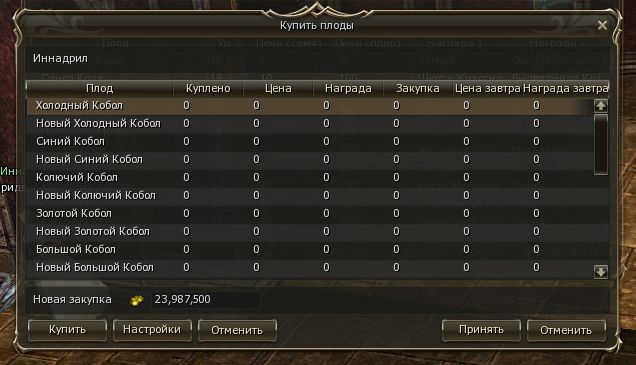
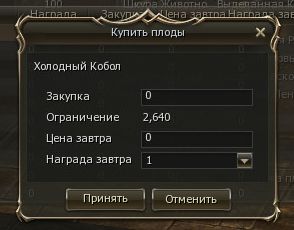
- Change: Opens a window for changing the parameters of the selected crops.
- Settings: Copies the crop purchase settings to the next period.
- Cancel: Stops buying crops from players.


List of available goods
Goods for ripe crops can be bought from the castle Blacksmith (he is in the basement under the throne room).
Manor - related pages
|


